Applications
8 Inch Stem Wall Application
Rocket Bracket is designed for saving time and money, so when building a stem wall, Rocket Bracket has many benefits to simplify the project. Rocket Bracket is a self-supporting bracket so you eliminate staking and supporting the inner form. It has a ½-inch support lift to raise the bracket slightly for ease of finishing concrete under the bracket. Rocket Bracket comes standard with ½ inch hole at the top for J-bolt placement for 2 x 6 construction. See below for application details
Block Wall Application
Rocket Bracket is designed with a 9/16-inch hole dead center to accommodate ½-inch rebar set every 3 feet. After setting the outside form board the Rocket Bracket is installed and is self-supporting for a 2 x 6 inner form board to maintain an 8-inch stem wall, so that you will be able to install a block wall with ease. Setting up a simple and fast stem wall eliminates setting in wet cement and guarantees perfect and level walls.
Deep Footing Application
When the frostline is deep in colder climate areas and footings are 3 feet to 4 feet below grade the Rocket Bracket is designed to accommodate a tall stem wall with an 8-inch finished concrete top and acts as the perfect cap for support to prevent blowout while vibrating forms and comes standard with a ½-inch hole to allow for a J-bolt to be included for 2 x 6 construction.
DETAILED APPLICATION INSTRUCTIONS
The outer form sets the quality of the foundation. The Form boards must be flat and straight. A twisted board will not allow the Rocket Bracket to be set correctly. Great care should be taken to set the board level using the support stakes. The level of the outside form will determine the level of the entire foundation. Any rebar elements to be inside the foundation should be placed in the trench before fastening the Rocket brackets on the outside form.
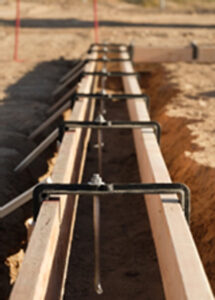
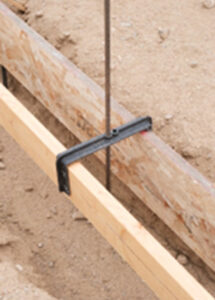
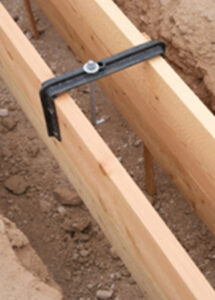
If you are doing a stem wall with J-bolts, the bolts should be placed in the brackets before fastening the bracket to the outer form board. The bolt should be about ½ inch above the bracket with the washer and nut holding it in the bracket (see the pictures). Mark the form board at the point where the bracket is to be placed so there is no need to measure the placement while fastening the brackets. Set a bracket (assembled with bolt, or empty for rebar on block wall) on the ground just on the outside of the form board at each marked spot.
We use 1 1/2” screws for fastening the bracket to the boards, usually with only two on each leg. The bracket is placed on the board with the inside step-up firmly on the top and the leg is flat against the board in a vertical position. While holding the leg use the other hand to place the screw in one of the bottom holes and then in the top hole on the opposite side of the leg. Done! Now do the next one!
With all the brackets in place, it is time for the inside form board. Start in one corner with a full-length board (we often use 2x10x12’). One worker fastens the first bracket, and then the other worker fastens their end. The floating side of the bracket is adjusted so that the same amount of space is left as on the other side of the bracket with the step-up. This is a variable amount because of the great variation in lumber. The floating side allows for level adjustment. After all brackets are in place for the first board then the next one is added, and so on. When it comes to sizing the last board to fit, you want to be as accurate as possible. Imagine that the cut end will butt into the next board going from the corner (see illustration). That way, the next board will be on the brackets and fit right to the inside of the cut end. The new board is screwed to the end of the cut board and the process continues on around the entire foundation.
The only difference with a block wall is that the rebar is put into the hole of the bracket after the bracket is in place (note that the bracket spacing, 3 ft. apart, is different from stem wall). The rebar is then braced into the soil in the proper vertical position.